How Do I Log In?
If your camera is not on an external POE switch, you may not be able to directly log into it as you would with a recorder. This is because cameras on the built-in POE ports of your recorder do not exist on your router's network. Instead, they exist on the recorder's internal network. If your cameras are online on your recorder, you may easily access them through the recorder.
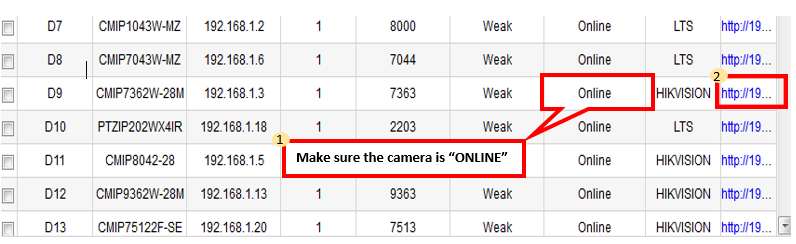
Note: If your camera's status is offline, this method will not work. Continue scrolling down for the offline camera section.
Setup
Step 1. Log into your recorder through the web browser.
Step 2. Select "Configurations."

Step 3. Select "System" to find your camera management settings. Go to "camera management" once you have selected your system settings.

Step 4. If your cameras are online, clicking their URL as shown in the image below will bring you directly to the logon page for the camera settings.
What if my camera is offline?
If your cameras are offline under camera management, you will not be able to log into the cameras or modify them from the recorder's end. You must have the following in order to access the camera or modify it.
1. A PC with an operating system that can support IP Portal, such as Windows 10.
2. An open LAN port on your PC.
3. Ethernet cable
4. IP Portal installed on the PC.
Step 1. Connect your PC to your NVR by connecting an Ethernet cable from the LAN port of your PC to the Built-IN POE port of your NVR.
Note: Do not connect it to your NVR's LAN port.

Step 2. Install IP Portal. Click here to learn how.
Step 3. On IP Portal, you should now see your cameras. Change their parameters and follow the IP scheme below. If you do not how to modify parameters, click here.
IP address: 192.168.188.XX
[The last part of the IP address must be different for every camera, e.g Cam 1: 192.168.188.20, Cam 2: 192.168.188.21]
Subnet: 255.255.255.0
Gateway: 192.0.0.1
Accessing the Camera
At this point, you can do one of several things.
1. Add it to your recorder and access it using the URL method above. Click here to learn more.
or
2. Access the camera directly through your PC. Continue reading to learn more.
Step 1. Observe the network settings of your device. For an example, assume that our camera has:
IP address: 192.168.188.50
Subnet: 255.255.255.0
Gateway: 192.0.0.1
Step 2: Open up your Network and Sharing Center or the equivalent network menu on your PC.

Step 3. Click on your connection type. A new menu will appear.

Step 4. Select "Properties" and a new menu will appear.

Step 5. Select "Internet Protocol Version 4 (TCP/IPV4)" and then select "properties," a new menu will appear.

Step 6. Select "Use the following IP address."

Step 7. Fill in the fields as needed.
Note: What you input is dependent on the device you are trying to access. In this example, we are trying to reach the login page for a camera, 192.168.188.50.
EXAMPLE:
After following the steps above and using IP Portal, we changed the IP camera to have the following settings.
IP address: 192.168.188.50
Subnet: 255.255.255.0
Gateway: 192.0.0.1
Therefore, we will input almost all of the same settings in their respective fields.
However, you will input a different IP address. It must be an unused IP address in the same scheme as the IP address of your device.
Do not use the same IP address as the camera/device you are trying to reach.

Step 8. You should now be able to access the login page on your browser using the 192.168.188.50 address.
Click here on how to use an IP address to reach your device's login page